
I discovered that mittens can be made on a Knifty Knitter long loom, just as easily as on a round loom. And using a long loom allows for many more sizing options. The only time, I think, you would not want to use a long loom for a mitten, is if you were planning a rolled cuff as in making a hat, as opposed to a ribbed cuff. I much prefer a ribbed cuff, because I think it fits better and looks nicer.
Here is a picture of a mitten made with a long loom using 20 pegs total:

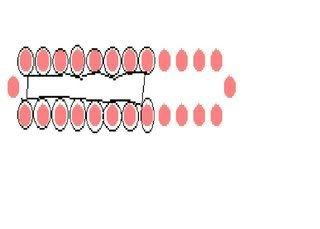
Here are some basic instructions for making a mitten similar using a round loom. If you would like to use a long loom, just follow along knitting in the round with a long loom, using the appropriate number of pegs. Here is a drawing of what I mean by knitting in the round with a long loom:

You just pretend it’s a round loom. But the narrowness of it prevents creating a folded or rolled cuff with it. Unless you chose to use the Knifty Knitter Purple rectangle loom, which is wider in the center. I adapted my mittens from the one loom mitten pattern, so it isn’t my very own creation, just my interpretation of it. These instructions in PDF form.
Supplies needed:
-1 skein (or more depending on size) of Lion Brand Wool-Ease Thick and Quick super bulky yarn
-9 stitch markers (or more depending on size)
-crochet hook, to match yarn (I used k I think)
-darning needle
-scissors
-knitting tool
-loom (either long loom, mitten loom, or blue kk loom) This pair was made using the 18 peg ITA mitten loom.
To start off with, place stitch markers on every other peg. If using a long loom, then you will be using 18 pegs total. This is to help you remember which pegs to knit and which to purl.
Crochet cast-on onto all 18 pegs.


Next you will be doing a 1/1 rib stitch for 15 rows. This is done by knitting one peg and purling the next all around the loom. This is where a row counter comes in handy. If you don’t have one, tally marks on a piece of paper works wonderfully. I keep a pad of paper in my loom tote just for this, and for knitting notes. Purling is where you place your yarn underneath the loop on your peg and use your knitting tool to pull the yarn up and through the loop on the peg. The loop on the peg is taken up and the new loop placed on the peg.

Next you will e-wrap the loom all the way around two times so that you have three wraps on each peg. Make sure that you wrap somewhat loosely, or knitting over will be very hard. We will be knitting the bottom loop over the top two loops, so 1 over 2 for the remainder of the mitten. For my mitten, I did this for 9 rows. The distance needs to go from your wrist to the base of your thumb. So adjust accordingly, I have small hands.

Now it’s time to start the thumb. For my thumb I use only 4 pegs, with no turning pegs. I knit each peg going back and forth in a flat panel. So, I knit pegs 1-4, then I go bach the other way and knit pegs 4-1. For my mitten I did this for 32 rows total. Do this until the thumb area, is long enough to fit your thumb, make sure to end back at peg 1.
After the thumb is long enough you will continue to knit in the round until the mitten is long enough to cover your hand. For me this was 27 rows. That row counter came in really handy, didn’t it?
Now, after it is long enough for your hand, you will have two loops on each peg. You will go around the entire loom and knit the bottom loop over the top loop on each peg to leave only one loop on each peg.

Now before removing the mitten from the loom, I have found it easier to finish the thumb while it is on the loom. To do this, you will thread a darning needle, with about 18-24 inches of yarn. You will start at the bottom of one side of the thumb, and you will tie a small knot to attach the yarn to the thumb. You will then sew up the thumb going back and forth and tightening until you reach the top of the thumb. Then you will place an extra stitch at the top to hold it tight, and you will run your needle under the inside of the thumb top stitches, snugly, but not overly so. You don’t want to make your tip tight, you just want to carry your yarn to the other side invisibly. Then you will sew down the other side and knot it at the bottom. Run the yarn through the inside stitches to hide the tail and snip off.

Now, it is time to remove the mitten from the loom. You will do so using the gather method, just as if you were making a hat. Run the yarn through each loop on the pegs.

Then before taking it off the loom, turn the mitten inside out. Leave the thumb right side out. Then remove each loop from the pegs and tighten to gather. Tie securely with a knot, then tie once again with yarn tail from mitten.

Run all yarn ends for a couple inches under the stiches to secure. Then clip and turn your mitten right side out. You now have a beautiful, warm new mitten. I’m double blessed, I have warm mittens and a lovely daughter too, lol.

If you want to make smaller versions then experiment with using fewer pegs for small children, or more pegs for larger hands or men, using a long loom. Use different yarn for the cuff portion or thumb. Be creative and make them personal. Nobody will have mittens exactly like yours.
If you are using a thinner yarn. Knit 1 over 3 for a nice warm, tight knit. Adjust the rows accordingly if using a thinner yarn. The only difference in the pattern for the blue mitten using a long loom above, was that I used 20 pegs instead of 18 to make it wider for my son. Otherwise the rows are just the same.
I hope this was helpful to you. I have had lots of fun making my family mittens this winter

i bought a loom this summer from america, and now i try to knitt, i make a scarf, a hat, and now i want to make some mittens, but i have a probleme whent i try to strat the thumb, i work on a long loom,because i don't have the round loom with 18 pegs, if u can help me, i wait an answer on girl_monikutza@yahoo.com, please write me
ÑææææææÚÉ
ÊÓáãí
where can I find an 18 peg round loom? Does anyone know?